
You have 4 options for using a template:
- Free Adobe Photoshop Template direct from Amazon
- Free Adobe Illustrator Template direct from Amazon
- Free GIMP Template direct from Amazon
- Create your own template
In terms of which image editing program to choose, we suggest Adobe Photoshop CC as it is the industry standard, fully featured, very easy to use and is only $9.99/£9.99 a month as part of their photography package.
Some people may be reluctant to pay the monthly subscription (I know I was when first starting out) but think about it this way, you only need to sell 2 t-shirts in a month and that’s the package paid for.
Our second suggestion would be Adobe Illustrator CC which is great if you’re going to look into creating vector based designs. It’s slightly more pricey than Photoshop at $19.99/£19.99 a month.
Our third suggestion is GIMP, which is a good image manipulation application but can be get a bit complicated for beginners. It is free however so your budget may determine whether this is your choice or not.
Finally, you can always create your own template as per the Amazon recommended specs of 15″W x 18″H @ 300ppi (i.e. 4500 x 5400 pixels), sRGB, less than 25MB. This isn’t something we’d recommend unless you are proficient with image editing programs. This is not something we will be discussing in this guide.
How To Use The Merch By Amazon Template With Adobe Photoshop
Regardless of which template you choose out of the three offered by Merch by Amazon, the process is largely the same. Because Photoshop is the most straight forward, we’ve decided to run through the tutorial with Photoshop.
Step 1: Grab Your Image Editing Program & Template
Using the links above grab your image editing program of choice and the corresponding template from MBA.
Step 2: Open Up the Template
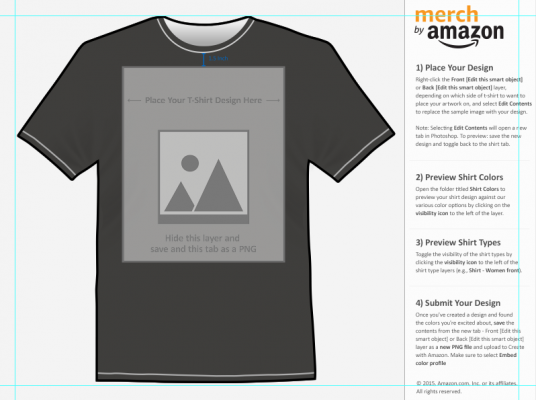
You’ll see something like the image below. A mock-up of a t-shirt with a stand in image on the front. Some instructions are also shown down the side but we’ll dig into this more deeply and show you how it works visually.
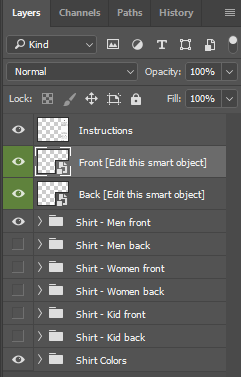
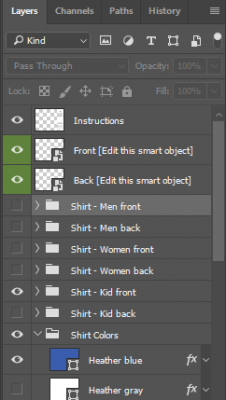
Step 3: Locate the Front Layer and Open it Up
In the layers panel highlight the “Front” layer, right click on it and click “Edit Contents”. This will bring up the workspace where you will actually create your design.
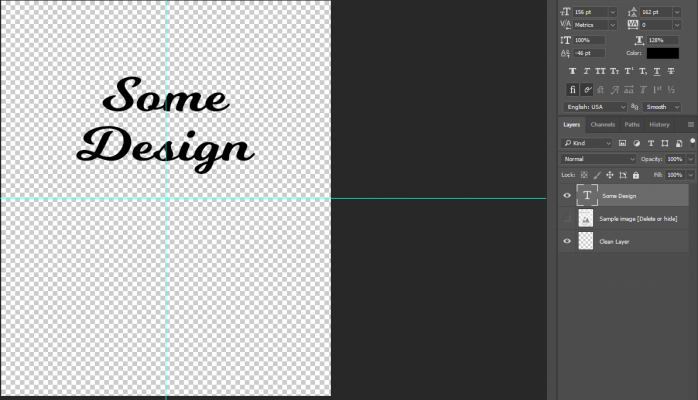
Step 4: Create Your Design
So your design workspace should have opened up. First things first, hide or delete the sample image layer.
Now get to work and add a new layer and get designing! Below you can see my groundbreaking design!! Obviously this is the point at which you spend the time pulling together a fantastic design for your tee.
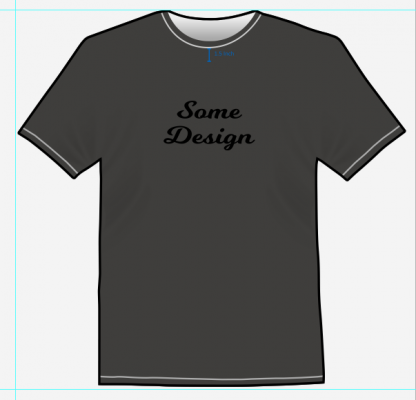
Once you’re happy with it hit ctrl + s or go to file -> save. The purpose of this step is it will update the mock up we saw when we first opened up the template.
Step 5: Review the Mock-up
Switch back to the original mock-up and make sure the design is aligned and looks OK. Hmm that’s all well and good but how will the design look on different colors or different t-shirt shapes (men’s shirts, women’s shirts, children’s shirts)? Let’s find out in step 6!
Step 6: Reviewing Size and Color Combinations
Still on your mock-up, take a look at the layers panel again. You’ll notice there are various folders. Try clicking in the empty box next to them and ta-da! The mock-up updates to reflect your selections. So you can see all color and size combinations before you even upload your design to Merch by Amazon.
Step 7: Save The Finished Product!
We now need to jump back into the “Front Layer”. It should already be open in a tab, but if not, just right click on “Front” again and click “Edit Content”. From here, we need to do a file->save as. Note file->save will not work for this.
The save dialog will pop up, select png as the type (this will retain the transparency needed for the t-shirt design), choose your location and click save. You will then be presented with the following pop-up – select smallest/slow for compression and none for interlace.

And that’s all there is to it! You’re done and your first design is in the bag!

The owner and primary content creator for Earnologist. My goal is to show you the best ways to earn online and offline and how to effectively save the money that you do make.
Now more than ever, people are searching for new ways to make a side income and here at Earnologist we do the research for you and provide extensive guides to help you earn while safeguarding your time.
If I’ve helped you out, feel free to Buy me a Coffee to show your appreciation!
")
Full offerwall guide for Game of Vampires. Learn how to reach Dominance 50k, 300k, 1.2M, 2M, 3.5M, 7M, 10M, 12.5M and VIP 4 for the Freecash & Swagbucks offer.

Full offerwall guide for MU Dark Epoch. Learn how to reach Character Level 15, 98, 167, 182, 199, 213, 248, 270, 318, 440 for the Freecash & Swagbucks offer.

On Swagbucks do you get the missing credit error (There might be a temporary Issue)? Find out how to fix.